How to Tailscale in a CTF team


When you start a CTF team inside your university, you usually don’t have access to a lot of resources, both in terms of hardware and software. You end up with a lot of scrapped second hand parts, with absolutely zero dedicated network infrastructure, but you still have to make the most out of it.
First of all we created a GitHub organization to host all our internal projects and it serves us as our main identity provider.
Initially GitHub was everything we needed, then we started to grow and our needs started to shift.
The first big change took place in 2022, when we started to train 25 selected students in the annual national CyberChallenge course. During the training we make vast use of the Capture The Flag format, so we’re required to host many intentionally vulnerable training challenges. You can put as many layers of sandbox, but when you host them in your University network, the sysadmins are not too keen on having something vulnerable freely available to the world wide web.
Moreover, in mid 2023 our team started to perform some IoT-related vulnerability research, and we needed somewhere safe to store all our reverse engineering efforts and findings.
All of these requirements brought us to Tailscale.
![]()
What’s Tailscale?
Tailscale is a mesh peer-to-peer VPN that allows to centrally define network security boundaries.
Why Tailscale?
Tailscale ticked all of the boxes.
- Dead simple installation and even simpler maintenance. Just connect your GitHub org to Tailscale and install the client on all of the services you want to bring together.
- Works in every network scenario, the University firewall is super restrictive and setupping a custom VPN wouldn’t be feasible at all. (Our network administrators and the security deparment know that we’re using Tailscale and they approve it).
- No useless configuration, install and (almost) forget.
- No performance penalties, Tailscale always tries to use the shortest network path between two peers, so the overhead and the latency hit is pretty much negligible if not zero.
What do we need to expose?
Our cloud infrastructure
To cover our need to host stable services the University gifted us a resonably beefy virtual machine within the on-site cloud. This machine runs Tailscale with SSH enabled and it hosts lots of docker-compose projects, which build up the great part of our Tailnet services and devices.
pwnlab: Docker Compose in your Tailnet
We train our students using the Capture The Flag jeopardy format,
for web, binary and crypto challenges.
This means we have to host some challenges to let trainees connect
and pwn them. Hosting a challenge is no different than hosting a regular
application, and Docker usually comes in really handy for this purpose.
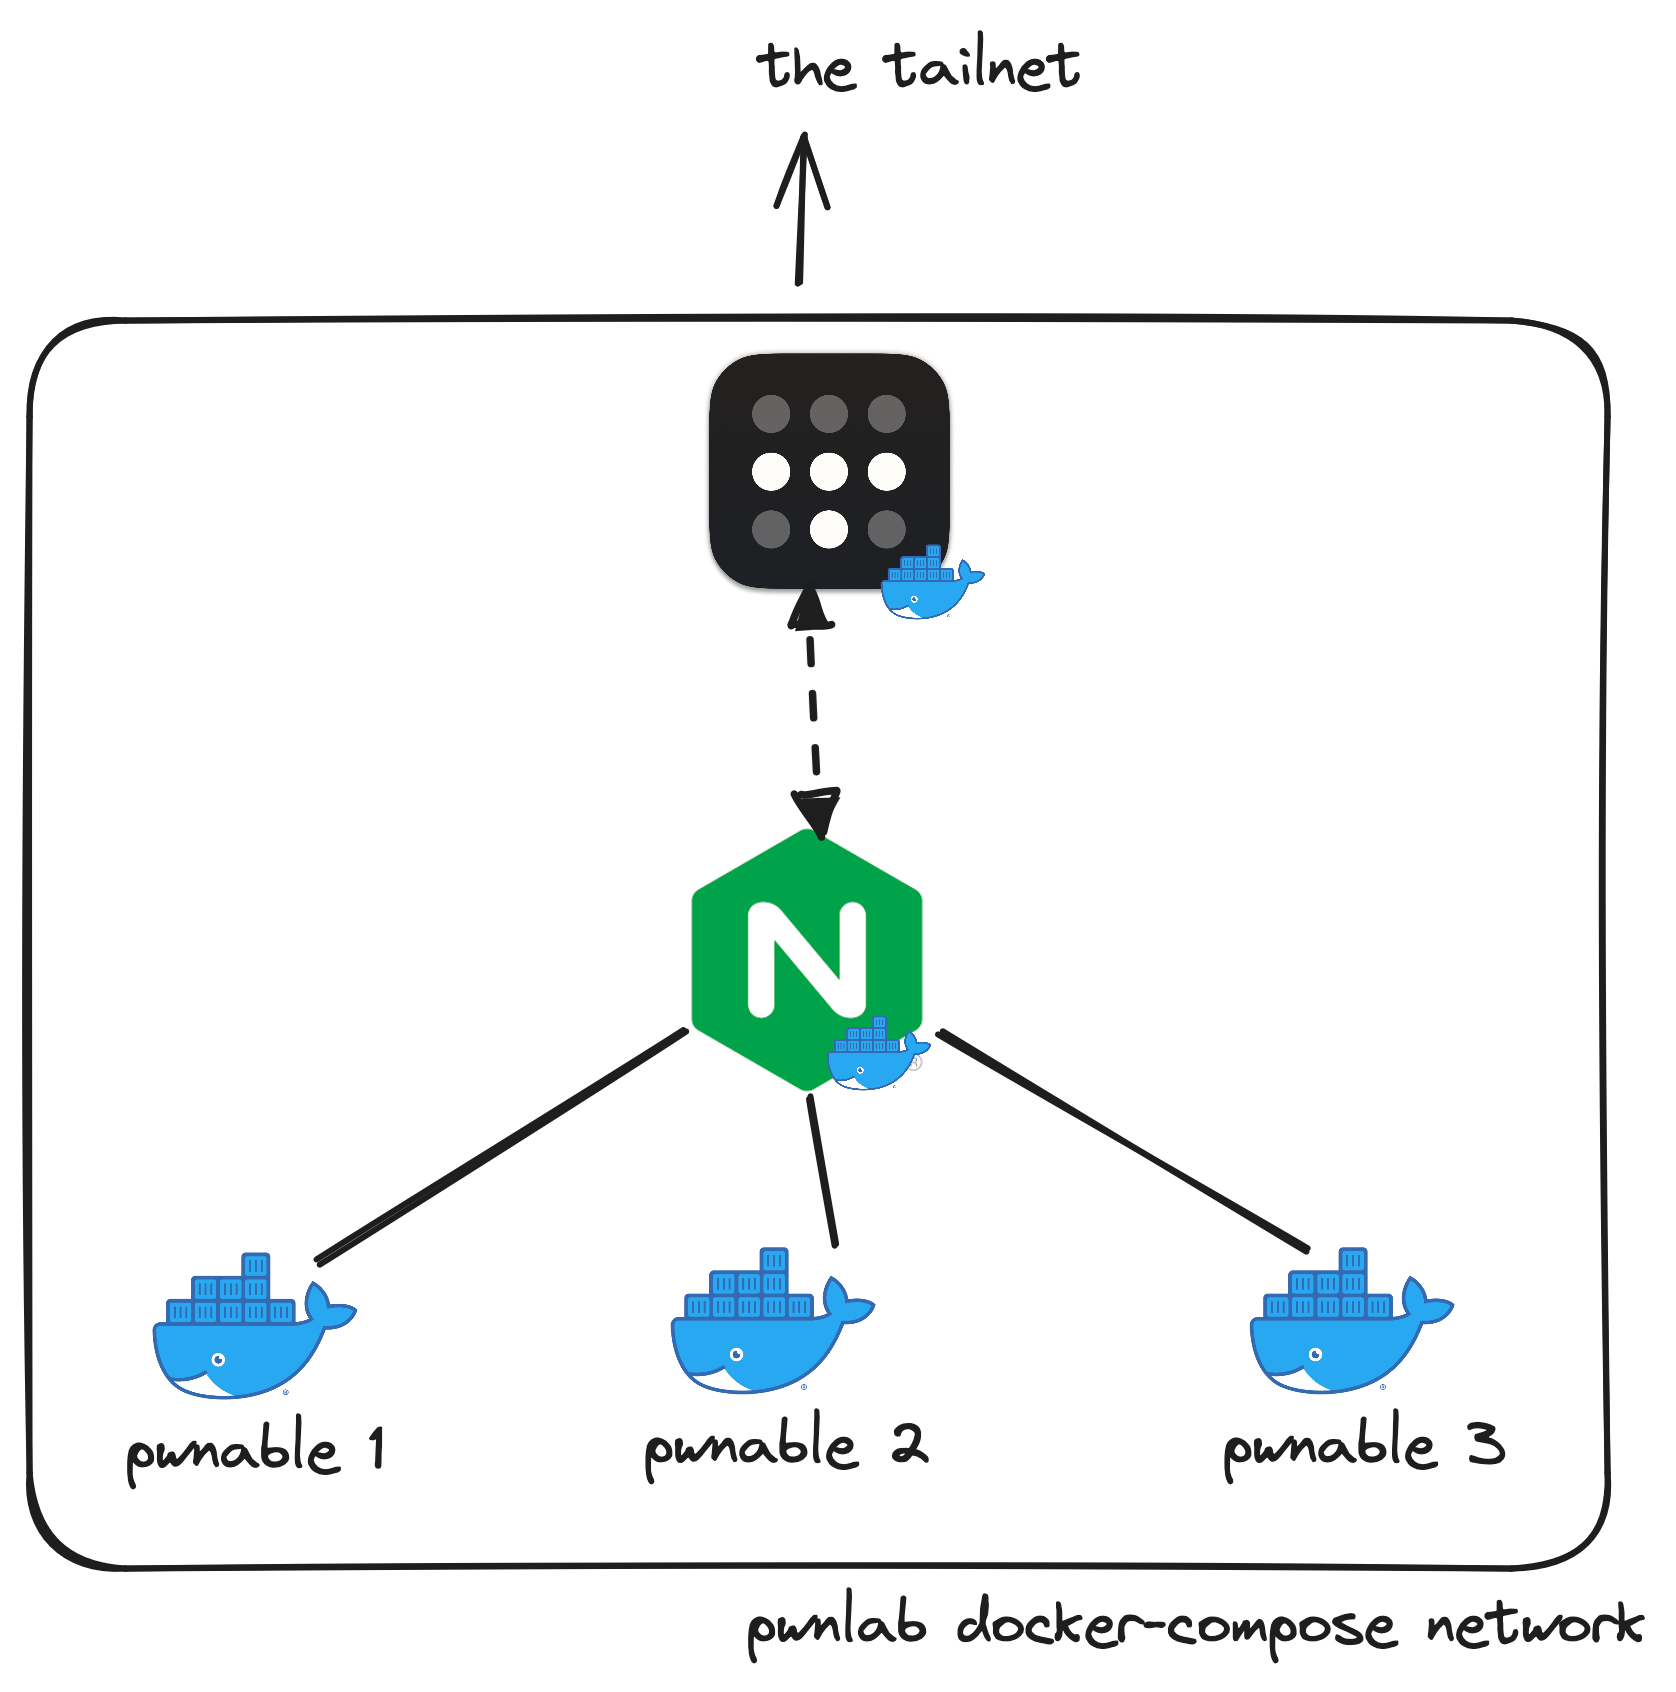
We host every pwnable challenge using a jail container. No challenge is directly exposed to the internet.
Every pwnable challenge is exposed to the Tailnet through a TCP reverse
proxy with an nginx container that has network_mode: "service:tailscale" set.
The base docker-compose.yml is used to describe every challenge
container.
# docker-compose.yml
version: "3.9"
services:
  ex1:
    build: ./ex1/
    restart: unless-stopped
    environment:
      - FLAG=${FLAG_EX1}
    privileged: true
  ex2:
    build: ./ex2/
    restart: unless-stopped
    environment:
      - FLAG=${FLAG_EX2}
    privileged: true
Then, we generate a docker-compose.nginx.yml based on the services
defined in the base docker-compose.yml, to generate the proper
nginx configuration and the docker-compose YAML file.
# Generated docker-compose.nginx.yml
version: 3.9
services:
  nginx:
    image: "nginx:stable"
    network_mode: "service:tailscale"
    depends_on:
      - list_of_containers
    volumes:
      - "./nginx.conf:/etc/nginx/nginx.conf"
And then, the last piece of the puzzle: the Tailscale container responsible for exposing the services to the Tailnet.
version: "3.9"
volumes:
  tailscale:
  tailstate:

services:
  tailscale:
    image: tailscale/tailscale:latest
    restart: unless-stopped
    environment:
      TS_AUTHKEY: ${TS_AUTHKEY:?err}
      TS_HOSTNAME: ${TS_HOSTNAME:-pwnlab}
      TS_AUTH_ONCE: true
      TS_STATE_DIR: /tailstate
      TS_SOCKET: /var/run/tailscale/tailscaled.sock
    volumes:
      - tailscale:/var/run/tailscale
      - tailstate:/tailstate
For more details and informations on how to customize the behaviour of the Tailscale Docker container, refer to this article.
Ghidra server
Ghidra is a very powerful reverse engineering software open-sourced by the NSA and it is our core tool for doing IoT research. Other than being an awesome tool to use with your local projects (like we mostly do for CTFs), it features an incredibly useful source version control server for shared projects: this comes very handy for working on big projects simultaneously with minimal overhead.
To deploy it inside our Tailnet we use a similar approach to before:
version: "3.9"
volumes:
  tailscale:

services:
  server:
    image: bytehow/ghidra-server
    restart: unless-stopped
    network_mode: service:tailscale
    environment:
      - PUID=1000
      - PGID=982
      - GHIDRA_USERS=admin devgianlu kriive
      - GHIDRA_PUBLIC_HOSTNAME=${GHIDRA_HOSTNAME:?err}
    volumes:
      - ./repos:/repos:z

  tailscale:
    image: tailscale/tailscale:stable
    restart: unless-stopped
    command: tailscaled
    volumes:
      - tailscale:/var/lib
      - /dev/net/tun:/dev/net/tun
    cap_add:
      - net_admin
      - sys_module
Going outside the Tailnet
Some of our software needs to be reachable even from outside the Tailnet for convenience, for example, our Bitwarden and our CTF entry website. Lucikly, Tailscale has us covered for this too: welcome Funnel!
Using Funnel we can expose a webservice to the Internet without needing to care about all the network aspects: just start it on a given device using the correct port, enable it on the ACL and you are website will be available publicly as a subdomain of your tailnet hostname.
Setting up Tailscale with Funnel has become very easy just recently with the release of this blog post. Our setup is very similar using the same docker-compose as before, this time for Vaultwarden:
version: "3.9"
volumes:
  vaultwarden:
  tailscale:
  tailstate:

services:
  vaultwarden:
    image: vaultwarden/server:latest
    network_mode: service:tailscale
    restart: unless-stopped
    volumes:
      - vaultwarden:/data

  tailscale:
    image: tailscale/tailscale:latest
    restart: unless-stopped
    environment:
      TS_AUTHKEY: ${TS_AUTHKEY:?err}
      TS_HOSTNAME: ${TS_HOSTNAME:-pwnlab}
      TS_SERVE_CONFIG: /funnel.json
      TS_AUTH_ONCE: true
      TS_STATE_DIR: /tailstate
      TS_SOCKET: /var/run/tailscale/tailscaled.sock
    volumes:
      - ./funnel.json:/funnel.json:ro
      - tailscale:/var/run/tailscale
      - tailstate:/tailstate
Then, inside the funnel.json file we have the following:
{
  "TCP": {
    "443": {
      "HTTPS": true
    }
  },
  "Web": {
    "${TS_CERT_DOMAIN}:443": {
      "Handlers": {
        "/": {
          "Proxy": "http://127.0.0.1:80"
        }
      }
    }
  },
  "AllowFunnel": {
    "${TS_CERT_DOMAIN}:443": true
  }
}
And just like that the Vaultwarden instance is reachable from the Internet on the designated domain for that device.
GitOps
Tailscale also makes very easy to configure your Tailnet permissions and ACLs using a GitOps-oriented approach. GitOps is a practice that allows to manage infrastructure and configuration using a version control system such as Git. This allows to track edits and quickly rollback problematic configurations.
Tailscale publishes a handy GitHub Action that allows you to both test your
policy.hujson file and update it in your Tailnet settings.
For further informations on how to set it up, follow the instructions located here.
Here’s the GitHub Action workflow file we’re using to manage our Tailnet.
# .github/workflows/tailscale.yml
name: Sync Tailscale ACLs

on:
  push:
    branches: [ "main" ]
  pull_request:
    branches: [ "main" ]

jobs:
  acls:
    runs-on: ubuntu-latest

    steps:
      - uses: actions/checkout@v3

      - name: Deploy ACL
        if: github.event_name == 'push'
        id: deploy-acl
        uses: tailscale/gitops-acl-action@287fb935799def5f8a2aef4df9b1286f78fc384b
        with:
          oauth-client-id: ${{ secrets.TS_CLIENT_ID }}
          oauth-secret: ${{ secrets.TS_CLIENT_SECRET }}
          tailnet: ${{ secrets.TS_TAILNET }}
          action: apply

      - name: Test ACL
        if: github.event_name == 'pull_request'
        id: test-acl
        uses: tailscale/gitops-acl-action@287fb935799def5f8a2aef4df9b1286f78fc384b
        with:
          oauth-client-id: ${{ secrets.TS_CLIENT_ID }}
          oauth-secret: ${{ secrets.TS_CLIENT_SECRET }}
          tailnet: ${{ secrets.TS_TAILNET }}
          action: test
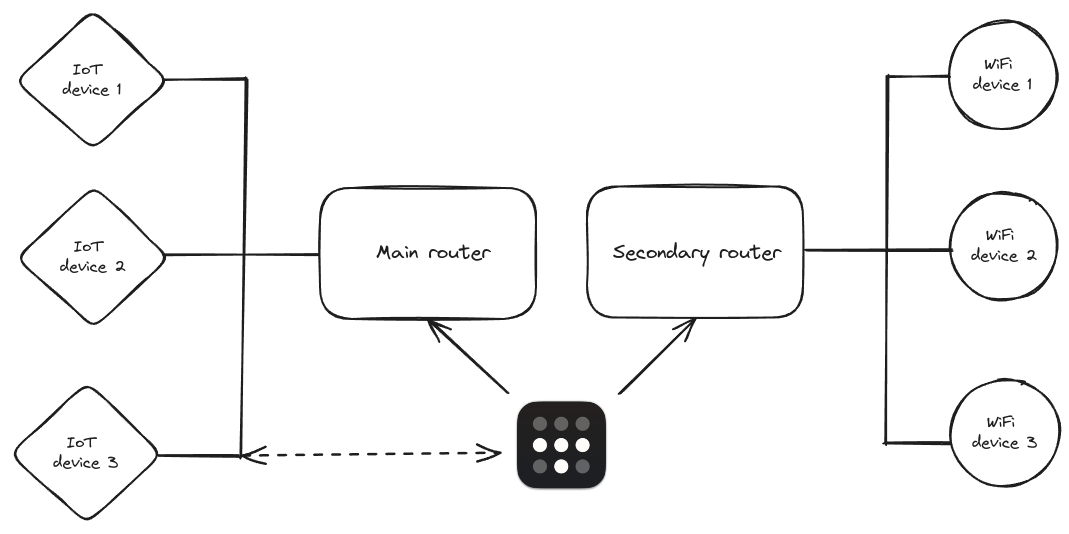
Our physical infra
The two routers are configured with Tailscale SSH to allow us to remotely SSH into them without having to worry about SSH keys, public or private IPs: being able to access them with their tailnet hostname and authenticate from the web is a game changer.
The main router is responsible for serving DHCP to all the wired devices we have in our lab which are mainly IoT devices powered by the PoE switches. Additionally, we advertise the entire subnet via Tailscale to be able to work on the devices without needing to be connected to the same network.
The secondary router is a very nomad device that we can move around to bring our WiFi network (and other DHCP server) wherever we need along with the Ubiquity AP. There’s no need for us to advertise that route via Tailscale since it’s mainly meant for giving connectivity to our students during lessons.